- Products

- Developers
- User stories
- Blog
- Pricing

Using MongoDB as a realtime database with change streams
Introduction
Getting data changes from a database in realtime is not as easy as you may think.
In a previous tutorial, I mentioned there are three main approaches to do this:
- Poll the database every X seconds and determine if something has changed using a timestamp, version number or status field.
- Use database or application-level triggers to execute a piece of code when something changes.
- Use the database transaction/replication log, which records every change to the database.
However, in MongoDB, change streams allows you to listen for changes in collections without any complexity.
Change streams are available since MongoDB 3.6 and they work by reading the oplog, a capped collection where all the changes to the data are written and functions as the database replication log.
In this tutorial, you’re going to learn how to stream, in realtime, the changes made to a collection in a MongoDB database to a React app using a Node.js server.
The application that you’ll be building allows you to add and delete tasks. It looks like this:
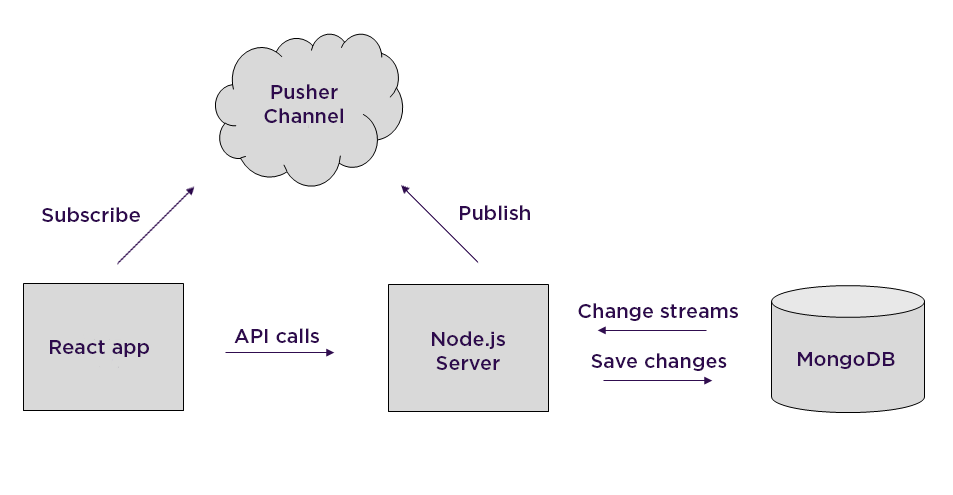
Under the hood, it communicates to an API implemented in Node.js that saves the changes to a database. The Node.js script also receives these changes using change streams, parsing them and publishing them to a Pusher channel so the React application can consume them.
Here’s a technical high-level overview that describes the above process:
Of course, a scenario where multiple applications are writing to the same database could be more realistic, but for learning purposes, I’ll use a simple application.
In addition, you’ll see how a solution like this one, could be a good alternative to the realtime database capabilities of Firebase.
Prerequisites
Here’s what you need to have installed to follow this tutorial:
- MongoDB (version 3.6 or superior)
- Node.js (6 or superior)
- Optionally, a JavaScript editor.
- Pusher account. Sign up for free or log in.
You’ll need to have knowledge of:
- JavaScript (intermediate level), in particular, Node.js and React.
- Basic MongoDB management tasks
For reference, here is a GitHub repository with all the code shown in this tutorial and instructions to run it.
Now let’s start by creating a Pusher application.
Creating a Pusher application
Go to the Pusher dashboard and create a Channels app, name your app, choose a cluster closest to your location. Optionally, choose React as the frontend tech and Node.js as the backend tech.

This will give you some sample code to get started:
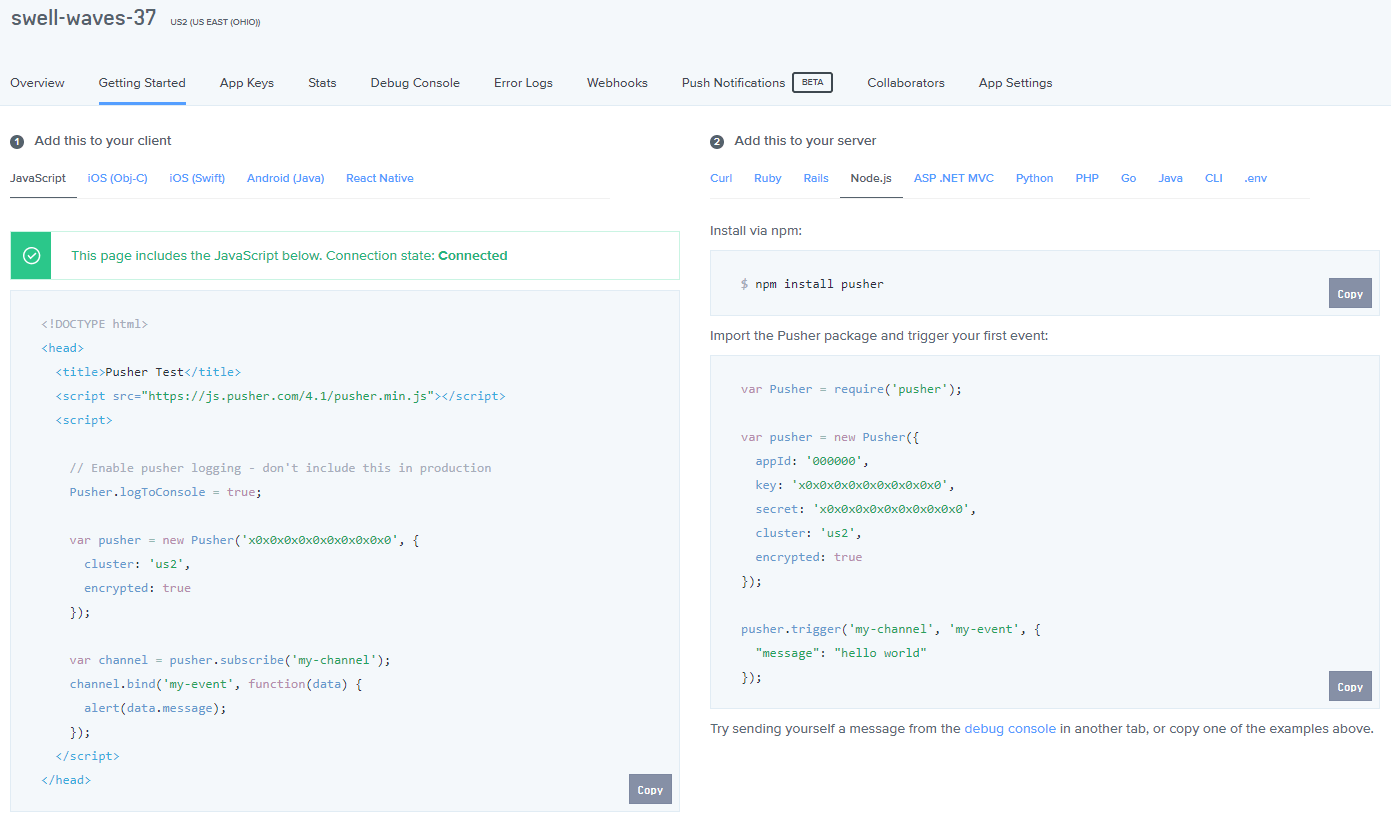
Save your app id, key, secret and cluster values. We’ll need them later.
Configuring MongoDB
Since change streams use MongoDB’s operations log, and the oplog is used to support the replication features of this database, you can only use change streams with replica sets or sharded clusters.
It’s easier to use replica sets, so let’s go that way.
A replica set is a group of mongod processes that maintain the same data set. However, you can create a replica set with only one server, just execute this command:
mongod --replSet "rs"
Remember that if you do not use the default data directory (/data/db or c:\data\db), specify the path to the data directory using the --dbpath option:
mongod --dbpath <DATA_PATH> --replSet "rs"
Next, in a separate terminal window, run mongo, the MongoDB client.
If this is the first time you create a replica set, execute rs.initiate():
1eh@eh:~/Documents/mongodb-linux-x86_64-3.6.4$ bin/mongo 2 MongoDB shell version v3.6.4 3 connecting to: mongodb://127.0.0.1:27017 4 MongoDB server version: 3.6.4 5 ... 6 > rs.initiate() 7 { 8 "info2" : "no configuration specified. Using a default configuration for the set", 9 "me" : "localhost:27017", 10 "ok" : 1, 11 "operationTime" : Timestamp(1527258648, 1), 12 "$clusterTime" : { 13 "clusterTime" : Timestamp(1527258648, 1), 14 "signature" : { 15 "hash" : BinData(0,"AAAAAAAAAAAAAAAAAAAAAAAAAAA="), 16 "keyId" : NumberLong(0) 17 } 18 } 19 } 20 rs:OTHER>
The application is going to watch the collection tasks in a database called tasksDb.
Usually, the database and the collection are created by the MongoDB driver when the application performs the first operation upon them, but for change streams, they must exist before opening the stream.
So while you are at mongo , create the database and the collection with the commands use and db.createCollection, like this:
1rs:OTHER> use tasksDb 2 switched to db tasksDb 3 rs:OTHER> db.createCollection('tasks') 4 { 5 "ok" : 1, 6 "operationTime" : Timestamp(1527266976, 1), 7 "$clusterTime" : { 8 "clusterTime" : Timestamp(1527266976, 1), 9 "signature" : { 10 "hash" : BinData(0,"AAAAAAAAAAAAAAAAAAAAAAAAAAA="), 11 "keyId" : NumberLong(0) 12 } 13 } 14 } 15 rs:OTHER>
Now you're ready to start building the application.
Let’s start with the Node.js server.
Building the Node.js server
Create a new directory and in a terminal window, inside that directory, initialize a Node.js project with the command:
npm init -y
Next, install the dependencies the application is going to use with:
npm install --save body-parser express mongoose pusher
- body-parser is a middleware for parsing the body of the request.
- express to create the web server for the REST API that the React app is going to use.
- mongoose is a schema-based library for working with MongoDB.
- pusher to publish the database changes in realtime.
Now the first thing we’re going to do is create a schema for the task collection. Create the file models/task.js and copy the following code:
1const mongoose = require('mongoose'); 2 const Schema = mongoose.Schema; 3 4 const taskSchema = new Schema({ 5 task: { type: String }, 6 }); 7 8 module.exports = mongoose.model('Task', taskSchema);
As you can see, the collection is only going to store the task as text.
Next, create the file routes/api.js and require the task schema and Express to create a router:
1const Task = require('../models/task'); 2 const express = require('express'); 3 const router = express.Router();
Create a POST endpoint with the /new path to save task:
1router.post('/new', (req, res) => { 2 Task.create({ 3 task: req.body.task, 4 }, (err, task) => { 5 if (err) { 6 console.log('CREATE Error: ' + err); 7 res.status(500).send('Error'); 8 } else { 9 res.status(200).json(task); 10 } 11 }); 12 });
And another one to delete tasks, passing the ID of the task using a DELETE method:
1router.route('/:id') 2 /* DELETE */ 3 .delete((req, res) => { 4 Task.findById(req.params.id, (err, task) => { 5 if (err) { 6 console.log('DELETE Error: ' + err); 7 res.status(500).send('Error'); 8 } else if (task) { 9 task.remove( () => { 10 res.status(200).json(task); 11 }); 12 } else { 13 res.status(404).send('Not found'); 14 } 15 }); 16 }); 17 18 module.exports = router;
Now, in the root directory, create the file server.js and require the following modules:
1const express = require('express'); 2 const bodyParser = require('body-parser'); 3 const mongoose = require('mongoose'); 4 const api = require('./routes/api'); 5 const Pusher = require('pusher');
Configure the Pusher object entering your app information:
1const pusher = new Pusher({ 2 appId : '<INSERT_APP_ID>', 3 key : '<INSERT_APP_KEY>', 4 secret : '<INSERT_APP_SECRET>', 5 cluster : '<INSERT_APP_CLUSTER>', 6 encrypted : true, 7 }); 8 const channel = 'tasks';
And configure an Express server with CORS headers (because the React app is going to be published in a different port), JSON requests, and /api as the path:
1const app = express(); 2 3 app.use((req, res, next) => { 4 res.header("Access-Control-Allow-Origin", "*"); 5 res.header("Access-Control-Allow-Headers", "Origin, X-Requested-With, Content-Type, Accept"); 6 res.header("Access-Control-Allow-Methods", "GET, POST, PUT, DELETE, OPTIONS"); 7 next(); 8 }); 9 10 app.use(bodyParser.json()); 11 app.use(bodyParser.urlencoded({ extended: true })); 12 app.use('/api', api);
This way, you can connect to the database passing the name of the replica set you configured before:
mongoose.connect('mongodb://localhost/tasksDb?replicaSet=rs');
And set two callbacks, one for connections errors and another one if the connection is successful:
1const db = mongoose.connection; 2 3 db.on('error', console.error.bind(console, 'Connection Error:')); 4 5 db.once('open', () => { 6 7 });
If the connection is successful, let’s start listening for connections on port 9000 and watch for changes on the tasks collection:
1db.once('open', () => { 2 app.listen(9000, () => { 3 console.log('Node server running on port 9000'); 4 }); 5 6 const taskCollection = db.collection('tasks'); 7 const changeStream = taskCollection.watch(); 8 9 changeStream.on('change', (change) => { 10 11 }); 12 });
Here comes the interesting part.
When there’s a change in the collection, a change event is received. In particular, the following changes are supported:
- Insert
- Update
- Replace
- Delete
- Invalidate
Here’s an example of an insert event:
1{ _id: 2 { _data: 3 Binary { 4 _bsontype: 'Binary', 5 sub_type: 0, 6 position: 49, 7 buffer: <Buffer 82 5b 08 8a 2a 00 00 00 01 46 64 5f 69 64 00 64 5b 08 8a 2a 99 a1 c5 0d 65 f4 c4 4f 00 5a 10 04 13 79 9a 22 35 5b 45 76 ba 45 6a f0 69 81 60 af 04> } }, 8 operationType: 'insert', 9 fullDocument: { _id: 5b088a2a99a1c50d65f4c44f, task: 'my task', __v: 0 }, 10 ns: { db: 'tasksDb', coll: 'tasks' }, 11 documentKey: { _id: 5b088a2a99a1c50d65f4c44f } }
You can use the _id property to resume a change stream, in other words, to start receiving events from the operation represented by that property.
Here’s an example of a delete event:
1{ _id: 2 { _data: 3 Binary { 4 _bsontype: 'Binary', 5 sub_type: 0, 6 position: 49, 7 buffer: <Buffer 82 5b 08 8b f6 00 00 00 01 46 64 5f 69 64 00 64 5b 08 8a 2a 99 a1 c5 0d 65 f4 c4 4f 00 5a 10 04 13 79 9a 22 35 5b 45 76 ba 45 6a f0 69 81 60 af 04> } }, 8 operationType: 'delete', 9 ns: { db: 'tasksDb', coll: 'tasks' }, 10 documentKey: { _id: 5b088a2a99a1c50d65f4c44f } }
Notice that in this case, the deleted object is not returned, just its ID in the documentKey property.
You can learn more about these change events here.
With this information, back to server.js, you can extract the relevant data from the object and publish it to Pusher in the following way:
1changeStream.on('change', (change) => { 2 console.log(change); 3 4 if(change.operationType === 'insert') { 5 const task = change.fullDocument; 6 pusher.trigger( 7 channel, 8 'inserted', 9 { 10 id: task._id, 11 task: task.task, 12 } 13 ); 14 } else if(change.operationType === 'delete') { 15 pusher.trigger( 16 channel, 17 'deleted', 18 change.documentKey._id 19 ); 20 } 21 });
And that’s the code for the server. Now let’s build the React app.
Building the React app
Let’s use create-react-app to bootstrap a React app.
In another directory, execute the following command in a terminal window to create a new app:
npx create-react-app my-app
Now go into the app directory and install all the Pusher dependency with npm:
1cd my-app 2 npm install --save pusher-js
Open the file src/App.css and replace its content with the following CSS styles:
1*{ 2 box-sizing: border-box; 3 } 4 5 body { 6 font-size: 15px; 7 font-family: 'Open Sans', sans-serif; 8 color: #444; 9 background-color: #300d4f; 10 padding: 50px 20px; 11 margin: 0; 12 min-height: 100vh; 13 position: relative; 14 } 15 16 .todo-wrapper { 17 width: 400px; 18 max-width: 100%; 19 min-height: 500px; 20 margin: 20px auto 40px; 21 border: 1px solid #eee; 22 border-radius: 4px; 23 padding: 40px 20px; 24 -webkit-box-shadow: 0 0 15px 0 rgba(0,0,0,0.05); 25 box-shadow: 0 0 15px 0 rgba(0,0,0,0.05); 26 background-color: #e9edf6; 27 overflow: hidden; 28 position: relative; 29 } 30 31 form{ 32 overflow: overlay; 33 } 34 35 .btn, input { 36 line-height: 2em; 37 border-radius: 3px; 38 border: 0; 39 display: inline-block; 40 margin: 15px 0; 41 padding: 0.2em 1em; 42 font-size: 1em; 43 } 44 45 input[type='text'] { 46 border: 1px solid #ddd; 47 min-width: 80%; 48 } 49 50 input:focus { 51 outline: none; 52 border: 1px solid #a3b1ff; 53 } 54 55 .btn { 56 text-align: center; 57 font-weight: bold; 58 cursor: pointer; 59 border-width: 1px; 60 border-style: solid; 61 } 62 63 .btn-add { 64 background: #00de72; 65 color: #fefefe; 66 min-width: 17%; 67 font-size: 2.2em; 68 line-height: 0.5em; 69 padding: 0.3em 0.3em; 70 float: right; 71 } 72 73 ul { 74 list-style: none; 75 padding: 0; 76 } 77 78 li { 79 display: flex; 80 justify-content: space-between; 81 align-items: center; 82 margin-bottom: 5px; 83 background-color: #dee2eb; 84 } 85 86 .text { 87 padding: 0.7em; 88 } 89 90 .delete { 91 padding: 0.3em 0.7em; 92 min-width: 17%; 93 background: #f56468; 94 color: white; 95 font-weight: bold; 96 cursor: pointer; 97 font-size: 2.2em; 98 line-height: 0.5em; 99 }
Next, open the file src/App.js and at the top, import the Pusher library:
import Pusher from 'pusher-js';
Define a constant for the API URL:
const API_URL = 'http://localhost:9000/api/';
In the constructor of the class, define an array for the tasks and a property for the text of a task as the state, and bind the methods to update the text and add and delete tasks:
1class App extends Component { 2 constructor(props) { 3 super(props); 4 this.state = { 5 tasks: [], 6 task: '' 7 }; 8 this.updateText = this.updateText.bind(this); 9 this.postTask = this.postTask.bind(this); 10 this.deleteTask = this.deleteTask.bind(this); 11 this.addTask = this.addTask.bind(this); 12 this.removeTask = this.removeTask.bind(this); 13 } 14 ... 15 }
Let’s review each method. Add them after the constructor, before the render() method.
The updateText method will update the state every time the input text for the task changes:
1updateText(e) { 2 this.setState({ task: e.target.value }); 3 }
The postTask method will post to task entered by the user to the API:
1postTask(e) { 2 e.preventDefault(); 3 if (!this.state.task.length) { 4 return; 5 } 6 const newTask = { 7 task: this.state.task 8 }; 9 fetch(API_URL + 'new', { 10 method: 'post', 11 headers: { 12 'Content-Type': 'application/json' 13 }, 14 body: JSON.stringify(newTask) 15 }).then(console.log); 16 }
And the method deleteTask will call the API to delete a task using its ID:
1deleteTask(id) { 2 fetch(API_URL + id, { 3 method: 'delete' 4 }).then(console.log); 5 }
On the other hand, you’ll also need methods to add and delete a task from the state so the changes can be reflected in the UI. That’s the job of the methods addTask and removeTask:
1addTask(newTask) { 2 this.setState(prevState => ({ 3 tasks: prevState.tasks.concat(newTask), 4 task: '' 5 })); 6 } 7 8 removeTask(id) { 9 this.setState(prevState => ({ 10 tasks: prevState.tasks.filter(el => el.id !== id) 11 })); 12 }
The app will call these methods when the corresponding event from Pusher is received.
You can set up Pusher and bind these methods to the inserted and deleted events in the method componentDidMount, entering your Pusher app key and cluster:
1componentDidMount() { 2 this.pusher = new Pusher('<INSERT_APP_KEY>', { 3 cluster: '<INSERT_APP_CLUSTER>', 4 encrypted: true, 5 }); 6 this.channel = this.pusher.subscribe('tasks'); 7 8 this.channel.bind('inserted', this.addTask); 9 this.channel.bind('deleted', this.removeTask); 10 }
This way, the render method just renders the tasks from the state using a Task component and a form to enter new tasks.
Replace the render() method with the following:
1render() { 2 let tasks = this.state.tasks.map(item => 3 <Task key={item.id} task={item} onTaskClick={this.deleteTask} /> 4 ); 5 6 return ( 7 <div className="todo-wrapper"> 8 <form> 9 <input type="text" className="input-todo" placeholder="New task" onChange={this.updateText} value={this.state.task} /> 10 <div className="btn btn-add" onClick={this.postTask}>+</div> 11 </form> 12 13 <ul> 14 {tasks} 15 </ul> 16 </div> 17 ); 18 } 19 }
And the code of the Task component (which you can place after the App class):
1class Task extends Component { 2 constructor(props) { 3 super(props); 4 this._onClick = this._onClick.bind(this); 5 } 6 _onClick() { 7 this.props.onTaskClick(this.props.task.id); 8 } 9 render() { 10 return ( 11 <li key={this.props.task.id}> 12 <div className="text">{this.props.task.task}</div> 13 <div className="delete" onClick={this._onClick}>-</div> 14 </li> 15 ); 16 } 17 }
And that’s it. Let’s test the complete application.
Testing the application
Make sure the MongoDB database is running with the replica set configured on the server:
mongod --dbpath <DATA_PATH> --replSet "rs"
In a terminal window, go to the directory where the Node.js server resides and execute:
node server.js
For the React app, inside the app directory, execute:
npm start
A browser window will open http://localhost:3000/, and from there, you can start entering and deleting tasks:
You can also see in the output of the Node.js server how change events are received from MongoDB:

Or on Pusher’s dashboard, select your app, and in the Debug section, you’ll see how the messages are received:
Conclusion
In this tutorial, you have learned how to persist data in MongoDB and propagate the changes in realtime using change streams and Pusher channels
This is equivalent to the functionality provided by Firebase and its realtime database. The advantage is that a solution like the one presented in this tutorial is more flexible and gives you more control.
From here, the application can be extended in many ways, for example:
- Support for more collections
- Implement an update functionality for the tasks (for example, the status) and replicate this event.
- Use the resume token to receiving the events from the last one registered, after a connection failure.
Remember that in this GitHub repository you can find the code of the Node.js server and the React app.
For more information about change streams, here are some good resources:


© 2024 Pusher Ltd. All rights reserved.
Pusher Limited is a company registered in England and Wales (No. 07489873) whose registered office is at MessageBird UK Limited, 3 More London Riverside, 4th Floor, London, United Kingdom, SE1 2AQ.